This guide is for Jacksonville homeowners planning to build a ground-level or elevated attached deck in their backyard. Difficulty: hard. This is a multi-weekend project -- plan on at least 3 to 4 weekends for a standard 12x16-foot deck. Total cost ranges from $3,500 to $9,000 in materials depending on decking material, framing lumber, and hardware. Hiring it done runs $18 to $35 per square foot in the Jacksonville market.
Florida has specific building requirements that differ from what you see in YouTube tutorials filmed in Ohio or the Pacific Northwest. Do not skip the permit and code section below. Building without a permit creates problems at resale and leaves you holding liability if someone is injured on an unpermitted structure.
Tools you need
- Circular saw and miter saw
- Drill and impact driver
- Post hole digger or rented towable auger
- Level (4-foot and 2-foot)
- String line and stakes
- Tape measure
- Framing square
- Post level
- Concrete mixing tub or rented mixer
- Safety glasses and work gloves
- Chalk line
Materials you need
- Pressure-treated lumber for framing (2x8, 2x10, 4x4 or 6x6 posts) -- $800 to $2,000 depending on size
- Concrete for footings (80-lb bags or ready-mix) -- $100 to $300
- Sonotube forms (12-inch diameter minimum) -- $10 to $20 each
- Decking boards (PT pine, composite, or hardwood) -- $600 to $3,000
- Joist hangers, post caps, beam caps (galvanized or stainless) -- $100 to $250
- Lag screws, structural screws, carriage bolts -- $80 to $150
- Ledger flashing (if attaching to house) -- $30 to $60
- Railing system (if deck is elevated over 30 inches) -- $400 to $1,200
- Stair stringers, treads, and hardware (if adding stairs) -- $200 to $600
Step-by-step instructions
Phase 1: Permits and code compliance
Step 1: Pull a permit before you touch the ground.
In Duval County, any deck over 200 square feet or attached to the house requires a building permit. Most decks fall under the Building Inspection Division's residential deck permit pathway. You will submit a site plan showing the deck location relative to property lines (setbacks), a framing plan showing beam and joist sizes, and footing depth.
Jacksonville is in Wind Exposure Category C or D depending on your specific address. This affects required connector hardware and framing spans. The permit reviewer will flag under-designed framing. Build to code from the start rather than failing inspection and tearing work out.
Permit fees in Duval County run $100 to $400 for a typical residential deck. Processing time is typically 2 to 4 weeks for a residential permit. Apply online through the Duval County Building Inspection portal.
Step 2: Confirm your setbacks.
Jacksonville's standard residential setback for accessory structures is typically 5 feet from rear property line and 5 feet from side property line, but your specific zoning category may differ. Pull your parcel record from the Duval County Property Appraiser's site and confirm the zoning classification. If you are in a recorded subdivision, your HOA covenants may impose stricter setbacks or require design approval.
Phase 2: Layout and footing installation
Step 3: Lay out the deck footprint.
Drive stakes at each corner of the deck and run string lines to form a perfect rectangle. Check for square by measuring both diagonals -- they should be equal. Adjust until the diagonals match within 1/4 inch. This step determines everything that follows. Do it carefully.
Mark the center of each footing location with a stake or spray paint. Footings must be positioned to support the beam layout specified in your permit drawings.
Step 4: Dig footings to the required depth.
Florida does not have a frost line concern, but Jacksonville's soil -- especially in older neighborhoods with sandy fill or near water -- can have soft or organic layers that require deeper footings. The Florida Building Code requires footings to bear on undisturbed soil or engineered fill with adequate bearing capacity.
A standard residential deck footing in Jacksonville is typically 12 to 18 inches in diameter and 24 to 36 inches deep. Your permit plans will specify the required size based on tributary load. In sandy soil near the St. Johns River or coastal areas, footings may need to be deeper or larger.
Step 5: Pour concrete footings with anchor hardware.
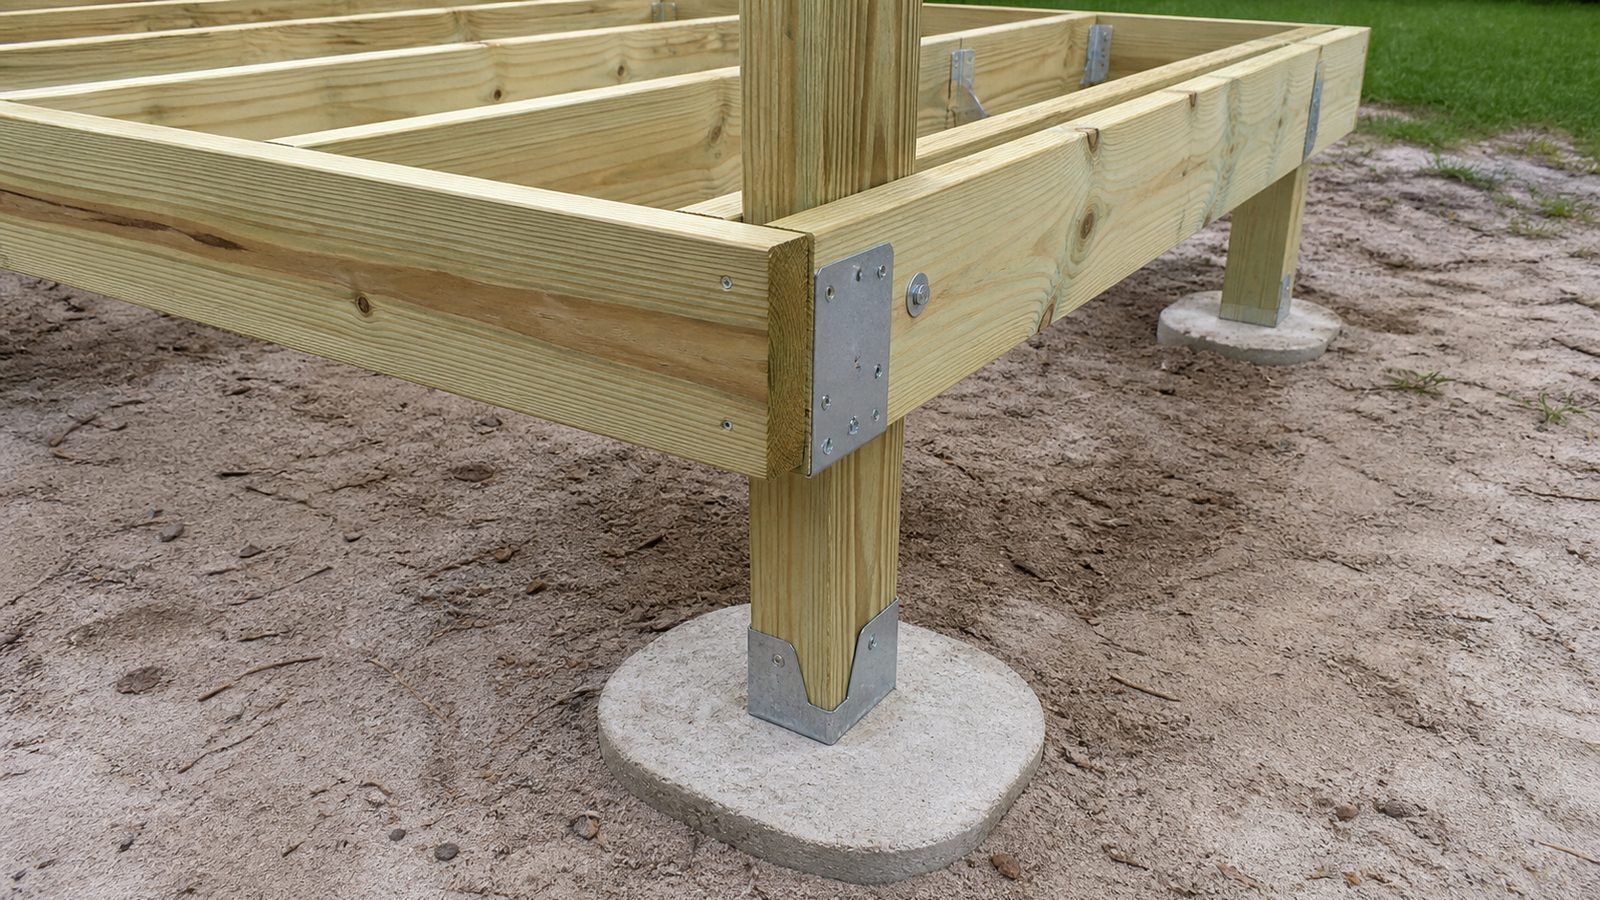
Set a sonotube form in each hole. Mix concrete and fill the tube to grade or slightly above. While the concrete is still wet, set a post base connector (Simpson ABU44, AB44, or equivalent) at the exact center of each footing, aligned to your string lines. Use a post level to confirm position before the concrete sets.
Let the concrete cure a minimum of 48 hours before loading it with post weight. In Jacksonville's heat, cover with wet burlap if pouring in direct sun to prevent surface cracking.
Phase 3: Posts, beams, and framing
Step 6: Set the posts.
Set 4x4 or 6x6 pressure-treated posts (use 6x6 for anything over 6 feet tall) in the post base connectors. Plumb each post in two directions and brace it temporarily with diagonal lumber stakes. Do not cut posts to final height yet.
Step 7: Install the beams and ledger.
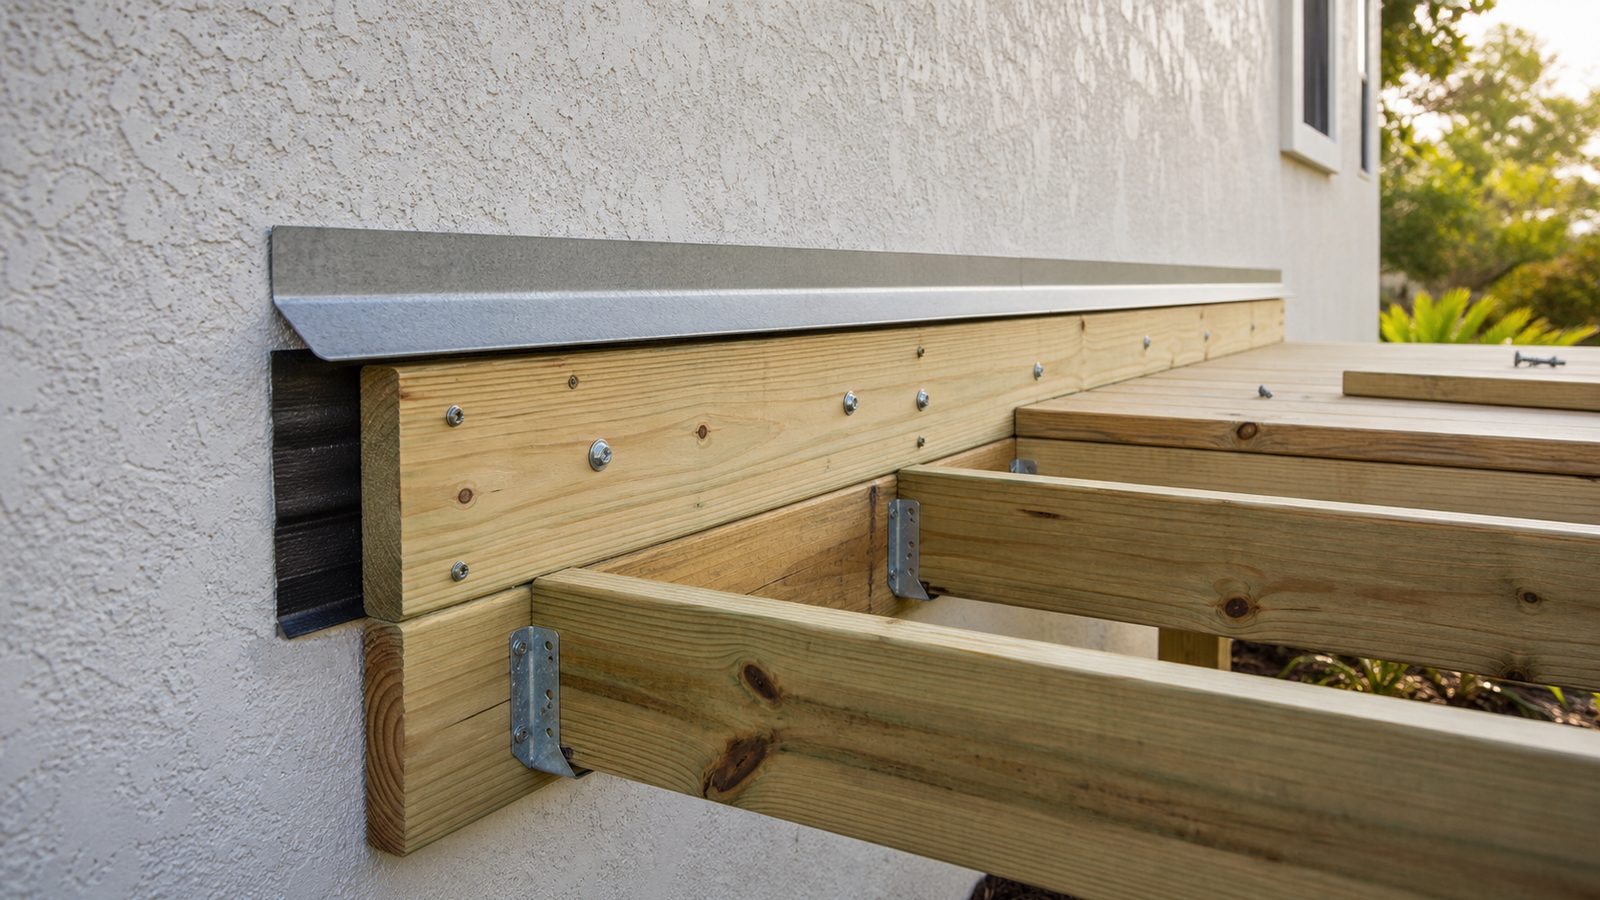
If the deck is attached to the house, the ledger board is the most important connection. Ledger attachment to the house rim joist must use through-bolts or code-approved screws on a specific pattern -- the IRC table for ledger fastening is the standard used in Jacksonville. The ledger must be flashed with metal or self-adhering membrane to prevent water infiltration behind it. This is a leading cause of house rot in Florida -- do not skip the flashing.
Set the beams on post caps and fasten per connector specifications. Check that the beam tops are level across the full span before installing joists.
Step 8: Install joists.
Hang joists on 16-inch centers using galvanized joist hangers. Install blocking at mid-span for any joist over 8 feet. In Florida's coastal environment, use hot-dipped galvanized or stainless steel hardware throughout -- zinc-plated hardware rusts quickly in our humidity and near salt air.
Phase 4: Decking
Step 9: Install the decking boards.
Start at the house and work outward. Leave a 1/4-inch gap between boards for drainage and expansion. Use two fasteners per board per joist -- do not skip fasteners to save time. Hidden fastener systems look clean but cost more and take longer. Standard face screwing with composite-head screws is fine for PT lumber.
Run the boards long and snap a chalk line at the outer edge, then trim with a circular saw for a clean consistent line.
Step 10: Cut posts to final height and install railing.
If the deck surface is 30 inches or more above grade at any point, a guardrail is required by Florida code. The top rail must be at least 36 inches above the deck surface. Balusters must be spaced to prevent a 4-inch sphere from passing through.
Use through-bolts to attach post bases to the rim joist -- surface-screwed railing posts will fail under load.
Phase 5: Stairs and final inspection
Step 11: Build stairs if needed.
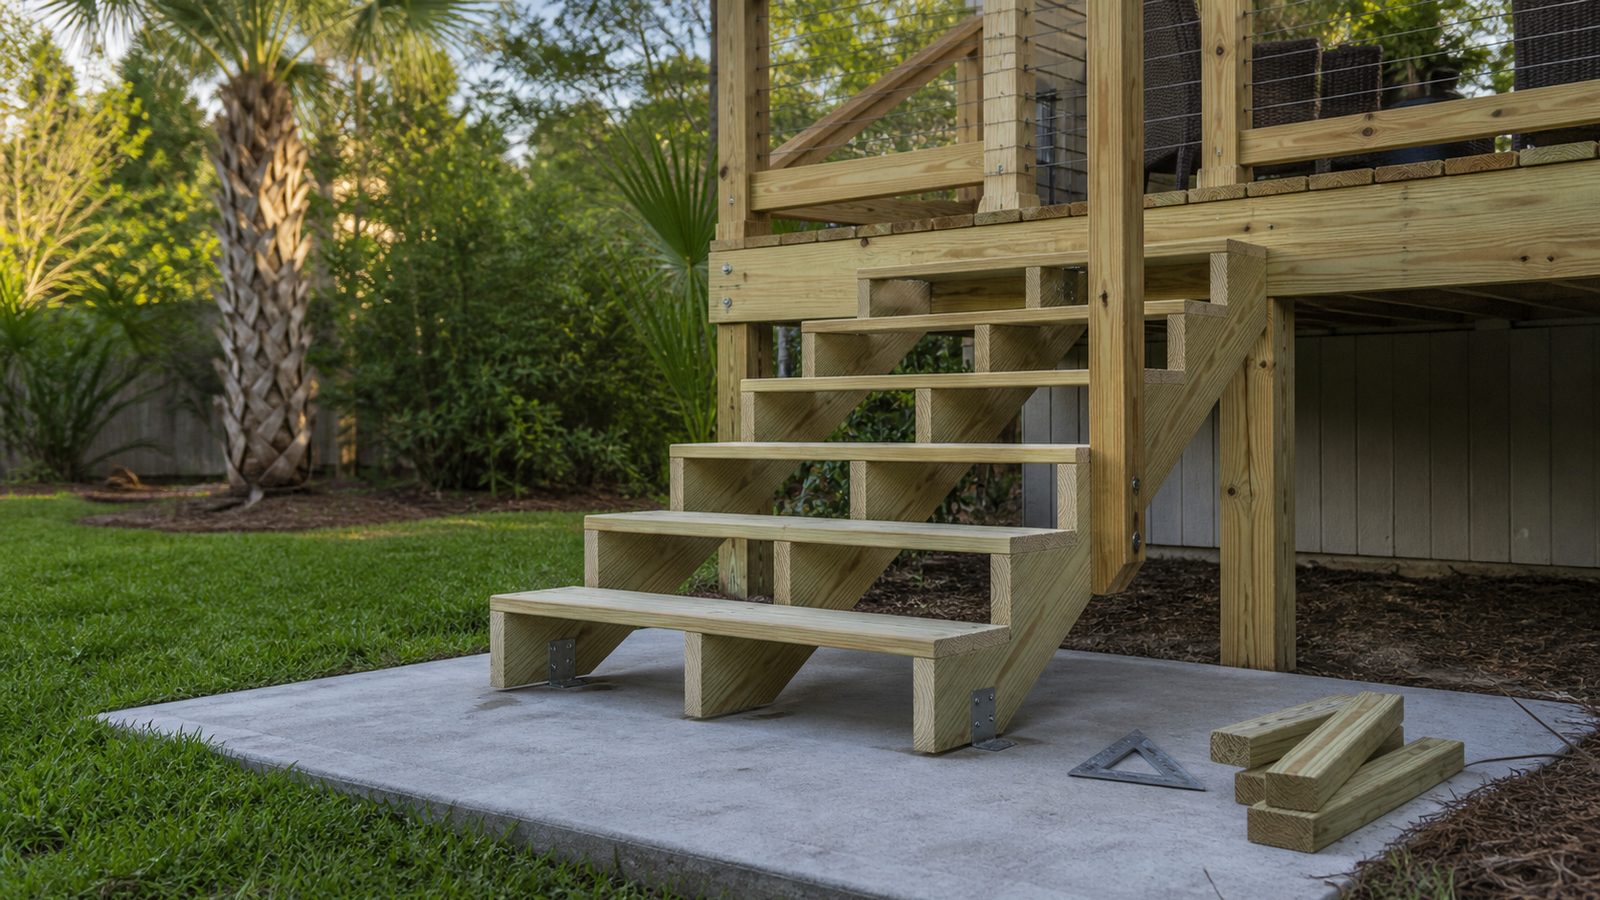
Stair rise cannot exceed 7-3/4 inches and tread depth must be at least 10 inches per Florida code. Calculate your total rise from the deck surface to grade and divide by the number of steps. Cut stringers carefully -- a small error at the top amplifies down the run. Anchor the bottom stringer to a concrete pad or footing, not to soil or mulch.
Step 12: Schedule inspection and close the permit.
Call for your Duval County inspection when the framing is complete but before decking is installed (so the inspector can see joist hangers and ledger connection). Schedule the final inspection after decking and railings are complete. Close the permit -- an open permit on your property record will flag on title searches at resale.
Common mistakes to avoid
- Building without a permit and hoping no one notices. The permit gets discovered at title search when you sell. The buyer's attorney will require it to be legalized or the unpermitted structure removed before closing.
- Using the wrong pressure treatment rating for ground contact. Deck posts and any lumber in contact with soil or concrete must be rated UC4B minimum. Standard UC3B decking lumber will rot within a few years if embedded in soil or concrete.
- Skipping ledger flashing. Water behind a ledger board rots the rim joist and band joist, sometimes for years before it is noticed. This repair can cost $3,000 to $8,000.
- Using zinc-plated hardware near salt air. Within 3 miles of the ocean in Jacksonville Beach, Atlantic Beach, or Neptune Beach, use stainless steel hardware throughout.
- Undersizing the beam for the span. Florida requires engineer-stamped or IRC span table-compliant framing. A 2x8 beam that works in a Northern state climate may not meet Florida's wind-load requirements for the same span.
When to hire a pro instead
Building a deck in Jacksonville is within reach for a patient DIYer with carpentry skills. But certain situations call for a licensed GC:
- Your yard has standing water, poor drainage, or you are near a wetland buffer -- footings in poor soil often need engineering.
- The deck is elevated more than 5 feet above grade, which requires more careful structural design.
- You are attaching to a second story or adding a covered roof structure over the deck -- this is a separate permit category.
- Your home is in a historic district (Springfield, Riverside, Avondale) where exterior changes require COA approval before permit.
- The project involves any electrical work (outlets, lighting, ceiling fans).
- You are in a flood zone (AE, VE, or X500) -- elevated deck framing in flood zones has specific requirements under Jacksonville's floodplain ordinance.
Need a Jacksonville GC for this job? Get a 48-hour free fixed-price estimate from JK Prestige Constructor.
No call center. No coordinator. A JK principal reviews every inquiry and replies with a real number, not a range, not a follow-up form.
Request Free Estimate →